这是SpringCloud实战系列中第二篇文章,了解前面第一篇文章更有助于更好理解本文内容:
①SpringCloud 实战:引入Eureka组件,完善服务治理
简介
Feign 是一个声明式的 REST 客户端,它的目的就是让 REST 调用更加简单。
Feign 提供了 HTTP 请求的模板,通过编写简单的接口和插入注解,就可以定义好 HTTP 请求的参数、格式、地址等信息。
而且 Feign 会完全代理 HTTP 请求,我们只需要像调用方法一样调用它就可以完成服务请求及相关处理。Spring Cloud 对 Feign 进行了封装,使其支持 SpringMVC 标准注解和 ttpMessageConverters。Feign 可以与 Eureka 和 Ribbon 组合使用以支持负载均衡,与 Hystrix 组合使用,支持熔断回退。
如果你没有使用 Spring Cloud,那么可以直接用原生的 Feign 来调用 API,如果你使用了 Spring Cloud,可以直接用 Spring Cloud OpenFeign 来调用 API。
使用原生API
这里以官方给出的Github示例为例,展示怎么使用原生的API来发起请求
interface GitHub {
  @RequestLine("GET /repos/{owner}/{repo}/contributors")
  List<Contributor> contributors(@Param("owner") String owner, @Param("repo") String repo);

  @RequestLine("POST /repos/{owner}/{repo}/issues")
  void createIssue(Issue issue, @Param("owner") String owner, @Param("repo") String repo);
}

public static class Contributor {
  String login;
  int contributions;
}

public class MyApp {
  public static void main(String... args) {
    GitHub github = Feign.builder()
                         .decoder(new GsonDecoder())
                         .target(GitHub.class, "https://api.github.com");
    // 调用接口,接收返回参数
    List<Contributor> contributors = github.contributors("OpenFeign", "feign");
    for (Contributor contributor : contributors) {
      // 打印输出结果
      System.out.println(contributor.login + " (" + contributor.contributions + ")");
    }
  }
}
上面的代码是一个 GET 请求的示列,定义了一个 GitHub 的接口,接口中定义了一个查询的方法和创建Issue的方法。
在方法上使用了@RequestLine 注解,定义了请求方法类型和请求的 URI,URI 中有对应的参数占位符,返回值有集合,集合中是对应的结构对象。
最后通过 Feign 的 builder 模式构建了 GitHub 接口对象后,就可以直接通过 GiuHub 接口对象调用里面的 contributors 方法。
支持的注解
-
@RequestLine
作用与方法上;定义请求,支持用大括号{expression}包装对应@Param注释参数。
使用示例:
@RequestLine("GET /repos/{owner}/{repo}/contributors") List<Contributor> contributors(@Param("owner") String owner, @Param("repo") String repo); -
@Param 作用于参数上;定义模板变量参数映射,代码示例同上。
-
@Headers 作用于类上或者方法上;定义请求头Header,代码示例:
```java @Headers("Accept: application/json") interface BaseApi<V> { @Headers("Content-Type: {contentType}") @RequestLine("PUT /api/{key}") void put(@Param("key") String key, V value,@Param("contentType") String type); } ``` -
@QueryMap 作用于参数上;定义name-value对的映射(POJO),以展开为查询字符串,代码示例:
```java public interface Api { @RequestLine("GET /find") V find(@QueryMap Map<String, Object> queryMap); @RequestLine("GET /findObj") V findObj(@QueryMap CustomPojo customPojo); } ``` -
@HeaderMap 作用于参数上;映射成HeaderMap,代码示例:
```java public interface Api { @RequestLine("POST /") void post(@HeaderMap Map<String, Object> headerMap); } ``` -
@Body 作用于参数上;定义一个模版,定义一个模版,解析对应的表达式,代码实例:
```java
@RequestLine("POST /")
@Headers("Content-Type: application/xml")
@Body("<login \"user_name\"=\"{user_name}\" \"password\"=\"{password}\"/>")
void xml(@Param("user_name") String user, @Param("password") String password);

@RequestLine("POST /")
@Headers("Content-Type: application/json")
// json curly braces must be escaped!
@Body("%7B\"user_name\": \"{user_name}\", \"password\": \"{password}\"%7D")
void json(@Param("user_name") String user, @Param("password") String password);
```
使用OpenFeign
原生的Feign API 使用已经很方便了,但是还有更简单的,惊不惊喜意不意外?Spring Cloud 推出了spring-cloud-openfeign,使用OpenFeign比使用原生的API还要简单。
先创建一个提供服务的项目:eureka-provider
-
具体的步骤和上一篇文章创建Eureka-Client 一模一样,有变动的配置:
server.port = 8082 spring.application.name=eureka-provider eureka.instance.appname=eureka-provider -
编写提供服务接口
@Controller public class HelloController{ @ResponseBody @RequestMapping(method = RequestMethod.GET, path = "hello") public String hello(){ return "hello, my name is eureka provider!"; } } -
启动服务,观察provider成功注册到注册中心

我们把之前的Eureka-Client 作为消费者,使用OpenFeign来调用刚刚创建的provider项目。
现在开始改造Eureka-Client 项目:
-
引入 spring-cloud-openfeign 组件
<dependency> <groupId>org.springframework.cloud</groupId> <artifactId>spring-cloud-starter-openfeign</artifactId> </dependency> -
在启动类上添加注解
@EnableFeignClients,启用Feign的客户端功能 -
定义Feign接口,@FeignClient 注解指定了服务名称
@FeignClient(value = "eureka-provider") public interface ProviderFeign{ /** * 调用 eureka-provider 的 hello 接口 * @return */ @RequestMapping("/hello") String hello(); } -
定义sayHello接口,通过feign调用provider的接口
@RestController public class SayHelloController{ @Autowired private ProviderFeign providerFeign; @GetMapping("sayHello") public String sayHello(){ return providerFeign.hello(); } } -
重启Eureka-Client 项目,访问http://localhost:8081/sayHello。页面显示
hello, my name is eureka provider!表示我们使用OpenFeign发起服务间调用成功。
至此一个简单使用OpenFeign发起服务间的调用示例就完成了,下面的教程是进阶版,了解一下还是非常有必要的。
使用OpenFeign的其他小技巧
Get 请求以对象作为参数提交
当服务提供者定义了一个Get请求的接口,参数是一个对象,比如这样的:
@RequestMapping(method = RequestMethod.GET, path = "query")
public String query(UserDTO user){
当服务调用方Feign使用@QueryMap来进行接口调用
@RequestMapping("/query")
String query(@QueryMap UserDTO userDTO);
这时候会发生服务提供方接收到的请求变为Post的现象,服务提供者接收到的请求报错信:
Resolved [org.springframework.web.HttpRequestMethodNotSupportedException: Request method 'POST' not supported]这种问题怎么解决呢?
-
把@QueryMap 注解换成
@SpringQueryMap注解就可以,这是最简单快速的解决办法。 -
在@RequestMapping注解中加入consumes的属性 在依赖中加入feign-httpclient包,之后在@RequestMapping注解中配置consumes属性
```java
@GetMapping(value = "/query",consumes = MediaType.APPLICATION_JSON_UTF8_VALUE)
```
把Feign 默认的 Client 替换成OKHttp
Feign 中默认使用 JDK 原生的 URLConnection 发送 HTTP 请求,我们可以把它换成httpclient或者OkHttp,添加如下配置即可:
# 启用okhttp
feign.okhttp.enabled=true
feign.httpclient.enabled=false
如果你不是用的spring-cloud-dependencies,或者里面没有okhttp的包,自己引入即可:
<dependency>
	<groupId>io.github.openfeign</groupId>
	<artifactId>feign-okhttp</artifactId>
</dependency>
配置Feign日志输出
FeignClient 有一个属性configuration,我们可以通过这个属性来自定义每个FeignClient的日志输出
-
新建一个配置类ProviderFeignConfiguration:
import feign.Logger;
...
@Configuration
public class ProviderFeignConfiguration{
    @Bean
    public Logger.Level loggerLevel(){
        return Logger.Level.BASIC;
    }
}
Feign日志记录的级别一共有4种:NONE、BASIC、HEADERS、FULL;
-
为@FeignClient指定配置
@FeignClient(value = "eureka-provider",configuration = ProviderFeignConfiguration.class) -
为FeignClient包所在位置单独配置日志隔离级别
logging.level.cn.jinglingwang.eurelaclient.demo.feign=DEBUG这一步你也可以不这样做,可以通过自定义继承 feign.Logger 重写log方法即可输出日志。
-
重启项目,访问接口http://localhost:8081/sayHello,查看日志输出变化:
DEBUG 20000 --- [nio-8081-exec-4] c.j.e.demo.feign.ProviderFeign           : [ProviderFeign#hello] ---> GET http://eureka-provider/hello HTTP/1.1
DEBUG 20000 --- [nio-8081-exec-4] c.j.e.demo.feign.ProviderFeign           : [ProviderFeign#hello] <--- HTTP/1.1 200 (4ms)
配置Auth认证
Feign提供了一个默认的拦截器BasicAuthRequestInterceptor,他主要的功能是为发起的Http请求添加一个请求头:template.header("Authorization", headerValue);
使用方法:
-
在刚刚上面的ProviderFeignConfiguration类里面添加以下代码即可:
@Bean public BasicAuthRequestInterceptor basicAuth(){ return new BasicAuthRequestInterceptor("username","jingling.im"); } -
改造下provider的接口代码,输出Header看是否能输出这个字段
@ResponseBody @RequestMapping(method = RequestMethod.GET, path = "hello") public String hello(HttpServletRequest request) throws UnsupportedEncodingException{ String header = request.getHeader("Authorization"); if(header != null && header.length() > 6){ String authorization = new String(Base64.decode(header.substring(6).getBytes("UTF-8")),"UTF-8"); System.out.println(authorization); } return "hello, my name is eureka provider!"; } -
重启两个项目,访问http://localhost:8081/sayHello,查看provider控制台成功输出以下内容:
username:jingling.im
配置超时时间
-
在刚刚上面的ProviderFeignConfiguration类里面添加以下代码:
@Bean
public Request.Options options(){
    return new Request.Options(5,TimeUnit.SECONDS,5,TimeUnit.SECONDS,true);
}
上面参数分别的意思是:连接超时5秒,读取超时5秒,true:遵循3xx重定向
通过配置文件配置Feign
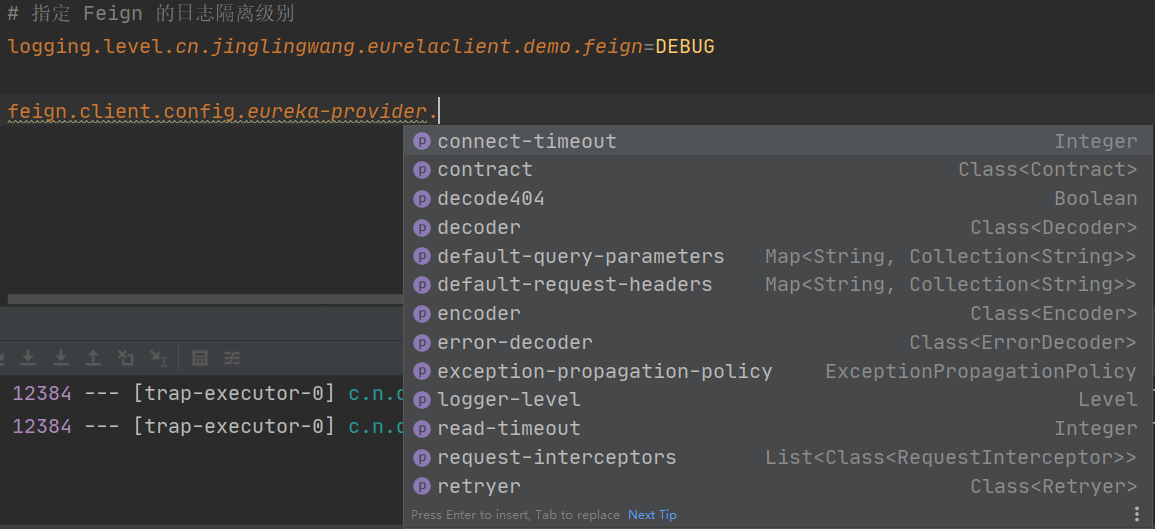
上面的配置基本上都是通过Java代码的方式来进行的,其实也可以通过配置文件来配置Feign,通过feign.client.config.{feignName}.xxx 来进行配置,比如:
# 单独配置Feing:eureka-provider的连接超时时间 1ms
feign.client.config.eureka-provider.read-timeout=1重启之后刷新接口http://localhost:8081/sayHello,出现超时的日志:

具体可以配置的配置项见下图:

注意:配置文件配置的优先级是大于上面Java代码配置的优先级的,从上面的测试结果也可以看出,因为我们同时使用了两种配置方式(重启时Java 的配置并没有注释),从下图所示的源码也可以看出:

总结
- Feign 支持原生的API和声明式注解两种方式发起请求
- 启用Feign客户端需要使用
@EnableFeignClients注解来开启 - FeignClient 支持配置文件和Java配置来控制,配置文件的优先级更高